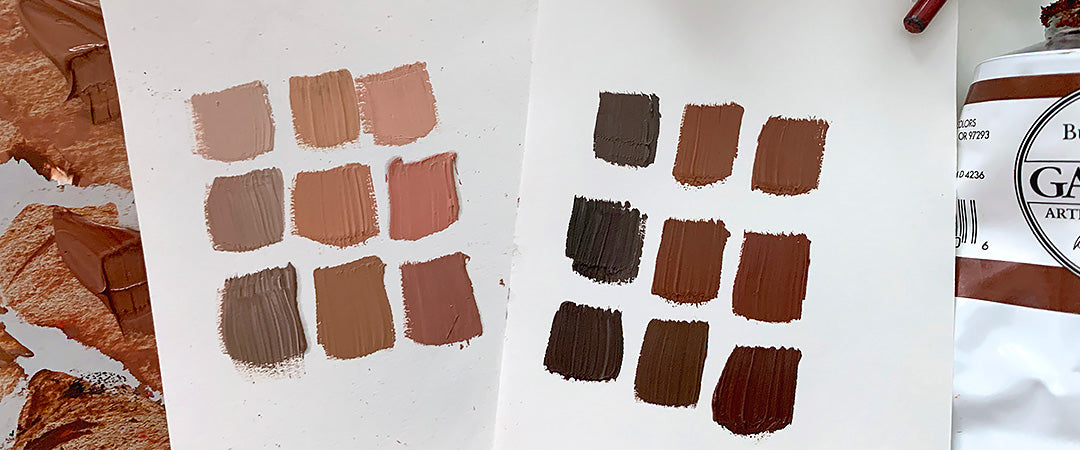
In this simple tutorial, our ambassador Alex Garant shares her foolproof recipe to get realistic skin tones using only six paint colours. You’ll learn to create a grid of skin tones ranging from warm to cold and light to dark for your oil or acrylic portraits. Let’s dive in!

Materials:
- Grey palette paper
- Small plastic painting knife
- Gamblin oil paints:
- Titanium White
- Yellow Ochre
- Cadmium Red
- Burnt Sienna
- Burnt Umber
- Payne’s Grey
- Paper towel or rag
Instructions:
Step 1
On your grey palette paper, mix an equal quantity of Titanium White and Burnt Sienna using your painting knife. Separate the mixture into 9 piles to form a 3-by-3 grid. The goal is to create a grid of colours ranging from cool to warm, and light to dark. The left column of the grid will consist of cold tones, the middle column of neutral tones, and the right column of warm tones. The top row of our grid will be for light tones, the middle row will be neutral, and the bottom row will consist of dark tones.
Step 2
Add a small amount of Titanium White to each of the 3 piles in the top row. Add a small amount of Burnt Umber to each of the 3 piles in the bottom row. Blend the colours using your painting knife.
Step 3
Add a touch of Payne’s Grey to the left column to create cold tones. These will be useful for parts of the skin that are blueish or greenish, like veins or creases. Blend the colours using your painting knife. Depending on your reference image or model, if you would like to increase the contrast between the colours in your left column, feel free to add a touch of Titanium White to the top-left pile, and a touch of Burnt Umber to your bottom-left pile.
Step 4
Add a touch of Yellow Ochre to the middle column to create a yellowish tone for areas of the skin that are not as pink as others. Blend the colours using your painting knife.
Step 5
Add a touch of Cadmium Red to each of your three piles in the right column to create a reddish tone for areas of the skin where there is more blood flow, like the cheeks, nose, ears or joints. Cadmium Red is very saturated, so a little goes a long way. Blend the colours using your painting knife.
You’ve now created a grid of 9 colours ranging from cool to warm (left to right) and light to dark (top to bottom). As you paint your portrait, ask yourself whether the part of the model or image you are painting is warm or cold, light or dark. This will allow you to immediately choose the right colour from your palette, without losing momentum by having to mix colours on the spot!
Step 6
Test your 9 tones on paper to see the contrast between them.

Step 7
Repeat the exact same process to create 9 darker colour blends for portraits with darker skin tones or lots of shadows. This time, our base will be half Burnt Sienna and half Burnt Umber. Create a 3-by-3 grid again by splitting your base colour into 9 piles. Add a touch of Titanium White to the 3 piles in your top row, and a touch of Burnt Umber (or Natural Umber) to the 3 piles in your bottom row. Blend the colours using your painting knife.

Step 8
Add a touch of Payne’s Grey to each of your three piles in the left column to create cold tones. Add a touch of Yellow Ochre to your three piles in the middle column. Add a touch of Cadmium Red to each of your three piles in the right column. Blend the colours using your painting knife.
You now have a second grid of 9 darker skin tones! Test them on paper to see the contrast between them.
Step 9
You’re all set to begin painting your portrait! Colder tones are often used for the bottom of the face (chin and jaw), whereas the nose, cheeks and ears are often warmer in tone, and the top of the face (such as the forehead) is often more neutral.
This simple recipe is sure to make life easier as you paint! Tag us on social media @deserres to let us know how you like it!


